Brick-to-brick installation is Trust Build's full-frame window replacement method. We remove the existing window, frame, brick mould, jamb extensions, and interior casing to expose the rough opening, then install a new, fully assembled window unit — complete with brick mould and jamb extension — directly into the structural opening.
This is not a retrofit. It is not an insert dropped into an old frame. It is a complete replacement that lets us inspect, insulate, and seal every part of the opening before the new window goes in.
What Gets Removed
During a brick-to-brick installation, our crew removes every part of the old window system:
- The existing window sash and insulated glass unit
- The old window frame (the buck)
- Exterior brick mould
- Interior jamb extensions
- Interior casing (trim around the window)
In some projects, window stools, aprons, and nearby drywall returns also need to be removed or replaced. This is determined on a case-by-case basis after our on-site inspection — we do not assume existing interior finishes will remain.
Why Jamb Extensions and Casing Are Removed
Jamb extensions bridge the gap between the window frame and the interior wall surface. Casing is the decorative trim that covers the joint between the jamb extension and the drywall. Both are removed for three reasons:
- The old frame must come out completely. Jamb extensions are attached to the frame, so they come out with it. You cannot remove the frame and leave the jamb extensions in place.
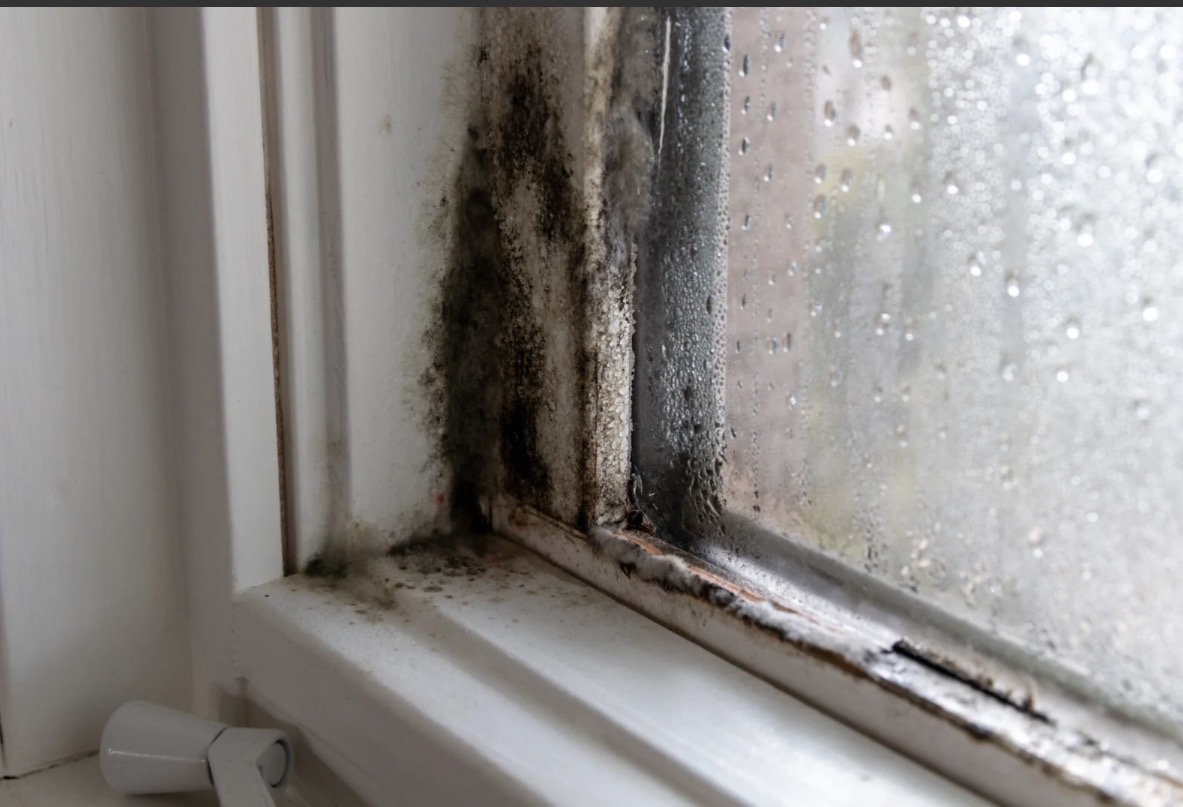
- We need to inspect the rough opening. Removing the interior trim gives us full access to check for moisture damage, rot, or compressed insulation that would be hidden behind the casing.
- We need access for waterproofing. Blueskin membrane must be applied to the full perimeter of the opening, including the jambs and sill. Existing trim in the way prevents a proper seal.
After installation, new jamb extensions and casing are installed to match the wall thickness and interior trim style of your home. This is included in every brick-to-brick quote.
Rough Opening Preparation
Once everything is removed, the rough opening is fully exposed — the structural cavity between the exterior brick (or siding) and the interior wall studs. Our preparation includes:
- Inspecting the exposed studs and header for moisture damage or rot
- Removing old caulking and sealant from the brick or siding perimeter
- Cleaning the opening to ensure proper adhesion of waterproofing materials
- Checking that the opening is square, level, and correctly sized for the new unit
- Adding or replacing insulation in the wall cavity where it is missing or compressed
This step is one of the main advantages of brick-to-brick over retrofit: we can see and fix problems that would otherwise stay hidden behind the old frame for another fifteen years.
Blueskin Waterproofing
Before the new window goes in, we apply Blueskin — a self-adhering waterproof membrane — to the sill and up the jambs of the rough opening.
Blueskin creates a continuous barrier between the wood framing and any moisture that might penetrate the exterior cladding. Water that gets past the brick mould or siding is stopped at the membrane and directed back outside instead of soaking into the studs.
The membrane is pressed firmly into place and sealed at corners and overlaps to eliminate gaps. At Trust Build, we consider this step non-negotiable. Skipping it saves a few minutes per opening but creates a hidden liability that can cost thousands in rot repair later.
Window Installation and Shimming
The new window arrives from our factory as a fully assembled unit, complete with brick mould on the exterior and jamb extensions on the interior. We set the window into the prepared opening and check it for level and square.
Shims are placed between the window frame and the wall studs to hold the unit in the correct position. The frame is mechanically fastened to the structural framing through the shims.
Proper shimming is critical: too few shims, and the frame can sag or twist over time. Too many, and you create thermal bridges. Our installers are trained to place shims at the correct spacing and orientation for each window size and wall type.
Low-Expansion Foam Insulation
With the window held in place by shims and fasteners, we fill the gap between the frame and the studs with low-expansion spray foam.
We apply the foam from both the interior and exterior sides to ensure complete coverage around the full perimeter. Low-expansion foam is used because it provides excellent insulation and air sealing without exerting enough pressure to bow or distort the window frame.
This step blocks drafts, reduces thermal bridging, and helps prevent condensation around the perimeter of the window — the exact spots where most retrofit installations leak air years later.
Red Tape Air-Sealing
After the foam has cured, we apply red construction tape over the exposed foam inside the wall cavity.
Red tape serves two purposes. First, it provides a durable air seal that prevents conditioned interior air from leaking into the wall cavity around the frame. Second, it protects the foam and acts as a secondary moisture barrier.
This detail — red tape over foam — is one of the small differences between a professional brick-to-brick installation and a job that looks fine on day one but leaks air by year three.
Interior Finishing
With the window sealed and insulated, we install new interior casing to match the existing trim style in your home. Depending on the project, this may also include new jamb extensions sized to the correct wall thickness, window stools and aprons, and paint-ready caulking at all joints.
Important: Brick-to-brick installation does not automatically preserve existing interior finishes. Each project is different. Some require full interior finish replacement; some allow portions of existing trim to remain. This determination is made only after our on-site inspection.
Advantages Over Retrofit Installation
Retrofit (or insert) installation leaves the old frame in place and slides a smaller window into it. Brick-to-brick offers clear advantages when the conditions call for it:
| Factor | Brick-to-Brick | Retrofit |
|---|---|---|
| Old frame | Removed and replaced | Left in place |
| Glass area | Full opening used | Reduced by ½"–1" perimeter |
| Rough opening inspection | Full access to studs and insulation | Limited or none |
| Perimeter insulation | Complete re-insulation with foam | Gap only, between new and old frame |
| Waterproofing | Full Blueskin membrane applied | Not possible behind existing frame |
| Interior finishing | New casing included in quote | Existing trim stays if sound |
| Typical service life | 25–40 years | 15–20 years |
Brick-to-brick is the permanent repair. Retrofit is the economical shortcut when the existing frame is sound and you do not need to change the opening size. During your free assessment, we inspect every frame and recommend the right method per opening.
When Brick-to-Brick Is Recommended
We recommend brick-to-brick installation when:
- The existing window frame is rotted, warped, or water-damaged
- The brick mould is cracked, loose, or missing
- You are enlarging, reducing, or otherwise modifying the window opening
- You are converting a basement window to an egress window
- You have experienced air leaks or condensation around the frame
- You want the maximum glass area and the longest possible service life
- Masonry repair work has been done around the opening
Not every window in every home needs brick-to-brick. In some projects, a mix of methods makes sense — brick-to-brick for the rotted front windows, retrofit for the sound rear windows, for example. We make this recommendation openly during your free on-site assessment, with photos of what we found behind your existing trim.
Book a Free Assessment
Every Trust Build project starts with a free, no-pressure assessment at your home. We inspect every opening, show you what is behind the existing trim, and recommend the right installation method — brick-to-brick, retrofit, or hybrid — for each window.
Call us at 1-800-563-1273 or request a quote online.